|
|
| Raquia | |
| |
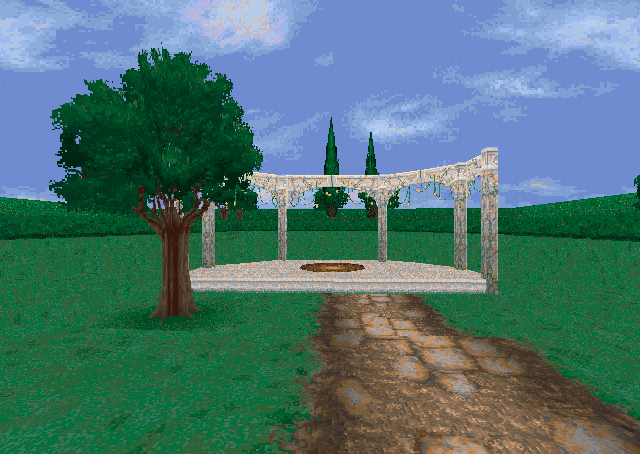
Raquia is the Realm of Spirit, filled with vibrant greenery, fountains of clear water and the blissful sound of chirping birds, emanating a welcome, yet delusory air of peace and tranquillity. As we'll come to learn soon enough though, even in this overtly halcyon place exist signs of physical decay and pollution.
The sparse architectural elements have a faintly Greek and Elysian quality to them and mainly consist of rose-covered[1] marble pillars, patios, water basins and fountains.
Raquia's main attractions include a topiary hedge maze and a large white tower, both of which contain various trials and puzzles for Adam and Rebecca to overcome in order to earn themselves the Key of Tears, the necessary item to free Hawk.
Sound is a predominant feature of Raquia, as we shall see further on during our exploration of Raysiel's Palace, where sound and the lack thereof have been specifically implemented in the puzzles that await us.[2]
Walkthrough[]
 |
 |
 |

|
|---|
Stepping off the tower gate by the rose-covered white arch, we take some time to familiarise ourselves with the unexpected change of scenery. Inhaling the fresh air, we're glad to see such lush vegetation, slowly and with a certain relish striding along the fragrant rose hedges[3], and admiringly looking up the high poplars[4] and blue sky. Traversing a small stone bridge running over a river of shallow water and proceeding through an alley of leaf trees, we move up a grassy staircase that's enclosed by more rose hedges and leaves us at a junction. Taking the left path, we get a first taste of evil pollution, as we're greeted by an ![]() Icon, a powerful horned gargoyle of sorts, shooting magical projectiles at us.
Icon, a powerful horned gargoyle of sorts, shooting magical projectiles at us.
Eventually we reach a wide flight of stairs that leads us across a large basin of shallow water to the entrance of the Raquia Maze where we make the acquaintance of Raysiel, the guardian power of this realm. The entity informs us that, in order to receive the Key of Tears, we have to pass a series of tests, namely gathering several items from inside the maze and completing the Spirit Ring:
![]() Raysiel - Trespassers
Raysiel - Trespassers
![]() Raysiel - Judge and Jailer
Raysiel - Judge and Jailer
![]() Raysiel - Tests
Raysiel - Tests
![]() Raysiel - the Spirit Ring
Raysiel - the Spirit Ring
![]() Raysiel - Power of the Key
Raysiel - Power of the Key
![]() Raysiel - the First Test
Raysiel - the First Test
Raquia Maze[]
| Raquia Maze | |

| |
The Raquia Maze is a labyrinthine complex filled with hidden Traps which will be activated if Adam and Rebecca have awoken Raysiel at some point during the trials in his tower. These Traps include chainsaws, pitfalls and moving walls which reconfigure the layout of the maze.
The objective here is to gather four items that are required to enter and solve the riddles inside Raysiel's Tower. Feel free to refer to the ![]() Map of the Raquia Maze for navigational purposes.
Map of the Raquia Maze for navigational purposes.
Earplugs[]
After having finished talking to Raysiel at the entrance of the maze, move left, right, right, take the first corner, then again the first corner to the left until reaching a fountain behind which you will find the ![]() Earplugs, necessary for one of the riddles inside Raysiel's Tower.
Earplugs, necessary for one of the riddles inside Raysiel's Tower.
Golden Haunch of Meat[]
Leaving the fountain through the long alley, turn left, turn immediately left again, follow the way, then move around the two corners, turn left, then right and you should come across a clearing, in the centre of which is a plinth. Inspect the bench and you will discover a small switch which lowers the plinth and reveals a ![]() Jewelled Haunch of Meat which will appease an otherwise invincible beast that's guarding the entrance to Raysiel's Tower.
Jewelled Haunch of Meat which will appease an otherwise invincible beast that's guarding the entrance to Raysiel's Tower.
Pan Pipes[]
Leave this place through the hitherto disregarded exit to your right, turn left and take the first corner to your right, walk to the end of this short alley, turn left, take the first corner to your right, follow the way (ignoring the first corner), move right once more and you should arrive at the site of two moving platforms. Traverse those and you will find a set of ![]() Pan Pipes, placed on a bench. The instrument is needed for opening one of the doors inside Raysiel's Tower.
Pan Pipes, placed on a bench. The instrument is needed for opening one of the doors inside Raysiel's Tower.
Spirit Ring (Incomplete)[]
Leave this place along the short passage through which you entered, turn left, disregard the first corners and take the second corner to your right, follow the way across two rectangular clearings, at the second clearing you take the path to the left, turn left, left again until you cross another rectangular clearing at which you take the first corner to your left, then move right thrice, turn left, follow the long alley, turn left twice, then right once more and should find a large pool with moving platforms. Traversing those successfully, you will find the ![]() Spirit Ring which is required to access Raysiel's Tower. The ring is incomplete at this point, the missing Amethyst gem can be found inside the afore-mentioned edifice. Therefore, leave the pool the way through which you came, turn left, take the first corner to your left and just follow the path until you reach the gates to Raysiel's Tower.
Spirit Ring which is required to access Raysiel's Tower. The ring is incomplete at this point, the missing Amethyst gem can be found inside the afore-mentioned edifice. Therefore, leave the pool the way through which you came, turn left, take the first corner to your left and just follow the path until you reach the gates to Raysiel's Tower.
Raysiel's Tower[]
| Raysiel's Tower | |||||

| |||||
Gallery
| |||||


Raysiel's Tower ![]() is situated beyond the Raquia Maze. Unless we're in possession of the incomplete Spirit Ring, we won't be allowed to enter, as a disembodied voice will kindly inform us upon approaching the edifice:
is situated beyond the Raquia Maze. Unless we're in possession of the incomplete Spirit Ring, we won't be allowed to enter, as a disembodied voice will kindly inform us upon approaching the edifice:
| “ |
The way is barred to you, spiritless beings. Return unto the gardens. |
” |
The filigree entrance gates (which seem to be considerably sturdy though, if Rebecca's estimation that an elephant couldn't open these is anything to go by) open up to a courtyard which is guarded by a ![]() mechanical lion invulnerable to the weapons in Adam's arsenal, an obstacle that can only be overcome by using the
mechanical lion invulnerable to the weapons in Adam's arsenal, an obstacle that can only be overcome by using the ![]() Jewelled Haunch of Meat found inside the hedge maze.
Jewelled Haunch of Meat found inside the hedge maze.
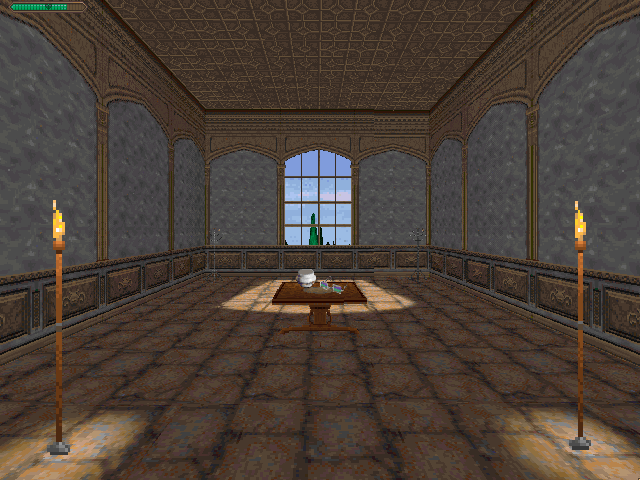
The actual tower can be entered through the portcullis. Once inside the imposing edifice, we keep to the left and move up the flight of stairs. At the first junction we come across, we turn left and follow the way, crossing a bright corridor with candlestands that treats us to a pleasant garden vista through the window front, at the end of which we take a right turn and ascend the stairs in front of us. Following the way, we come across another junction, at which we turn left and move through another windowed corridor that eventually leads us to the Bell Room.
Bell Room[]
Upon entering the large chamber, our attention is immediately drawn towards the ceiling, specifically to the massive bell, attached to which we spot four ![]() Olympian figures[5] that carry hammers. The floor is irregularly covered with static and spinning cogs, treading on them too often will set off the bell. Hence we should avoid falling off the moving platforms that allow us to navigate across the room.
Olympian figures[5] that carry hammers. The floor is irregularly covered with static and spinning cogs, treading on them too often will set off the bell. Hence we should avoid falling off the moving platforms that allow us to navigate across the room.
First of all, we move forward onto the static platform and jump on the second static platform to our left. Proceeding onto the staircase in front of us, let's try and quench any potential desire to pull the lever, as it will set off the bell. Rather we proceed onwards onto the horizontally moving block and onto the static block just after that. Stepping onto the staircase and onto the static platform just after that, we now take the moving platform and jump onto the undulating staircase. After jumping onto the static block, we turn around and jump onto the moving platform to our right which will take us all the way to the gallery. Travelling across one last moving platform, we eventually reach a large room with several doors and a huge octagonal plinth in the centre.
Room of Riddles[]
Upon entering the Room of Riddles (as we'll subsequently refer to this location), we find that the brightly illuminated hall is subdivided into seven chambers, each requiring a certain item in order to enter and/or make it traversable without harm, some of which we are fortunate enough to have in our possession already. Looking up, our eyes fall on a curious shimmering walkway and a plinth which can be activated later on by putting a certain gem into the small pentagonal indentation we spot on the floor.
We decide to approach the ![]() first door to our left, as our attention is caught by several musical notes that have been carved into the wood. We learn that Rebecca is adept at reading music. From our ventures through the Raquia Maze, we remember having picked up the set of
first door to our left, as our attention is caught by several musical notes that have been carved into the wood. We learn that Rebecca is adept at reading music. From our ventures through the Raquia Maze, we remember having picked up the set of ![]() Pan Pipes that we clumsily use for playing the fanfare, allowing us to enter a small and admittedly quite hospitable room with a quaint wooden table, from which we gather a pair of oddly shaped and magically-imbued
Pan Pipes that we clumsily use for playing the fanfare, allowing us to enter a small and admittedly quite hospitable room with a quaint wooden table, from which we gather a pair of oddly shaped and magically-imbued ![]() Spectacles and a
Spectacles and a ![]() ceramic bowl, apparently filled with oil, provided that our olfactory system does not deceive us.
ceramic bowl, apparently filled with oil, provided that our olfactory system does not deceive us.
The next door is protected by a ![]() peculiar security device, a moving face asking us to speak a certain password which we lack at this point.
peculiar security device, a moving face asking us to speak a certain password which we lack at this point.
The third door then, opens up to a room with several colourful tapestries adorning the walls and the ceiling and a pair of Oriental carpets. In the centre, we spot a ![]() female figure that's floating in mid-air and emanating a humming noise. Rebecca recalls having seen a similar picture in a book she once read about the myth of Odysseus, serving us as a fairly overt hint to use the pair of
female figure that's floating in mid-air and emanating a humming noise. Rebecca recalls having seen a similar picture in a book she once read about the myth of Odysseus, serving us as a fairly overt hint to use the pair of ![]() Earplugs we found inside the Maze and protecting us from the otherwise inflicted physical harm. Approaching the figure, we take the nicely worked
Earplugs we found inside the Maze and protecting us from the otherwise inflicted physical harm. Approaching the figure, we take the nicely worked ![]() Silver Key she carries as a necklace.
Silver Key she carries as a necklace.
Entering the fourth room, Rebecca comments on its coldness, a complaint we at first do not clearly perceive as we still wear the Earplugs. After having taken them off, we try to traverse the floor, drawn by the ![]() Silver Armlet in the far end. Unfortunately, the ice breaks under our weight, causing a noise which is noticeable enough for Raysiel to warn us about waking him up.[6] Apparently, we need a specific substance and decide to leave for now.
Silver Armlet in the far end. Unfortunately, the ice breaks under our weight, causing a noise which is noticeable enough for Raysiel to warn us about waking him up.[6] Apparently, we need a specific substance and decide to leave for now.
The door to the fifth room creaks upon opening, luckily we have some oil to fix its rusted hinges. We step into a study of sorts, featuring various book cases and piles of books on the floor, a working table in the far end of the room, a worn-out blue rug with a pentacle design and several astronomical notes and sketches hung-up on the walls. Our surroundings are filled with a peculiar humming, and we find that at this point, it's a wise thing to put on the pair of ![]() magical glasses, allowing us to see several laser beams that connect the book stacks on the floor. Moving heedlessly through the room, we would otherwise knock them over and activate a trap that batters us with deadly projectiles. Artfully hopping over the security beams and cautiously approaching the working table in the far end of the room, we take a small piece of unfaded
magical glasses, allowing us to see several laser beams that connect the book stacks on the floor. Moving heedlessly through the room, we would otherwise knock them over and activate a trap that batters us with deadly projectiles. Artfully hopping over the security beams and cautiously approaching the working table in the far end of the room, we take a small piece of unfaded ![]() parchment on which we spot the word 'spirit', the password that's required for entering the door with the moving face.
parchment on which we spot the word 'spirit', the password that's required for entering the door with the moving face.
The sixth door can be opened with the ![]() Silver Key we took from the floating Siren earlier on. We set foot into a Chapel of sorts. With a certain solemnity, we walk through an alley of candle stands and notice that the floor has the shape of a
Silver Key we took from the floating Siren earlier on. We set foot into a Chapel of sorts. With a certain solemnity, we walk through an alley of candle stands and notice that the floor has the shape of a ![]() heptagonal star and the letters 'ROYGBIV' etched into it. The topmost point is coloured red which we take for a clue: gathering the seven gems from the exquisite and admittedly quite decadent stained glass window in front of us, we apparently have to arrange them according to the colour spectrum. Additionally, below the star, we spot the following piece of writing:
heptagonal star and the letters 'ROYGBIV' etched into it. The topmost point is coloured red which we take for a clue: gathering the seven gems from the exquisite and admittedly quite decadent stained glass window in front of us, we apparently have to arrange them according to the colour spectrum. Additionally, below the star, we spot the following piece of writing:
| “ |
See where the sky bridge lies, opening our hearts and minds. |
” |
The following gems are now in our inventory:
![]() Garnet, vitreous silicate mineral, representative of the colour Red
Garnet, vitreous silicate mineral, representative of the colour Red
![]() Turquoise, representative of the colour Blue
Turquoise, representative of the colour Blue
![]() Emerald, a variety of Beryl, representative of the colour Green
Emerald, a variety of Beryl, representative of the colour Green
![]() Amber, fossil resin, representative of the colour Orange
Amber, fossil resin, representative of the colour Orange
![]() False Topaz, a transparent yellow variety of Quartz, representative of the colour Yellow
False Topaz, a transparent yellow variety of Quartz, representative of the colour Yellow
![]() Amethyst, a type of quartz, representative of the colour Violet
Amethyst, a type of quartz, representative of the colour Violet
![]() Sapphire, a little dull according to Rebecca, representative of the colour Indigo
Sapphire, a little dull according to Rebecca, representative of the colour Indigo
Placing them in the correct manner, a small plinth will appear and with it, a ![]() Rainbow-coloured Key. The gems will be replaced with small flames which we're free to trample out, lest to potentially burn down Raysiel's whole Palace.
Rainbow-coloured Key. The gems will be replaced with small flames which we're free to trample out, lest to potentially burn down Raysiel's whole Palace.
The seventh room next to the Chapel features an oddly looking floor that will chime under our weight. Rebecca identifies this unusual design element as a so-called Nightingale Floor or uguisubari, if we use the Japanese term. We should abstain from traversing this room for now, as we still lack an adequate item that will allow us to move silently and thus avoid waking up Raysiel.
Hence we return to the door with the moving face. Asking Rebecca for advise, she will suggest words like 'Raquia', 'Raysiel' and 'Key of Tears', supplied without liability though. Remembering that we have the correct password in our possession at this point, having investigated the small piece of parchment found in the study, we decide to speak the word 'spirit' and the guard will allow us to access a room with a fire glyph, from which we gather a ![]() ceramic bowl that's warm to the touch and has no specific smell. It's filled with a hot liquid that will aid us in traversing the icy floor and fetching a curious
ceramic bowl that's warm to the touch and has no specific smell. It's filled with a hot liquid that will aid us in traversing the icy floor and fetching a curious ![]() Silver Armlet, covered with magical runes that are connected to sound, specifically to the lack thereof, and which is used for silently moving across the previously-mentioned Nightingale Floor. With the Coloured Key from the Chapel we open a second door and find a small casket that contains a
Silver Armlet, covered with magical runes that are connected to sound, specifically to the lack thereof, and which is used for silently moving across the previously-mentioned Nightingale Floor. With the Coloured Key from the Chapel we open a second door and find a small casket that contains a ![]() Vial and a
Vial and a ![]() Coloured Gem which will fit in the small pentagonal indentation we've spotted in the main hall and thus activate the plinth, allowing us to access the shimmering walkway.
Coloured Gem which will fit in the small pentagonal indentation we've spotted in the main hall and thus activate the plinth, allowing us to access the shimmering walkway.
Solution table for quick reference[]
| # | Image | Name | What to do | Items |
|---|---|---|---|---|
|
Into the door of this room are carved several notes which you have to play on the Pan Pipes you found inside the labyrinth. | |||

|
Use the Flask of Oil to avoid creaking noises when opening the door. Before entering the actual room, put on the Spectacles to see several laser rays connecting the book stacks.[7] | |||

|
The door to this room is protected by a security device, a moving face that inquires a password in order to enter. The parchment with the password ("spirit") is inside the Library. | |||

|
Douse the ice floor with the warm substance from the Ceramic Flask you found in the Fire Room, in order to melt the floor which would otherwise break and wake up Raysiel. | |||

|
Wear the Earplugs you found inside the Raquia Maze to protect yourself against the noise coming from the floating Siren figure, and pick up the Silver Key that she's wearing around the neck. | |||

|
Open the room with the Silver Key. Pick up the 7 Gems from the stained glass window and arrange them on the etched star on the floor according to the colour spectrum. | |||

|
Equip the Silver Armlet to move silently across the Nightingale Floor.[8] The door that lies beyond can be opened with the Coloured Key, the small locker contains the Coloured Gem. |
Acquiring the Key of Tears[]
By placing the ![]() Coloured Gem into the indentation on the floor in the main hall, we activate a platform allowing us to continue our journey across the shimmering walkway. Proceeding through the succeeding corridor, we eventually enter a room which is characterised by a violet colour scheme (the colour usually associated with spirituality) and a humming noise that appears to originate from the
Coloured Gem into the indentation on the floor in the main hall, we activate a platform allowing us to continue our journey across the shimmering walkway. Proceeding through the succeeding corridor, we eventually enter a room which is characterised by a violet colour scheme (the colour usually associated with spirituality) and a humming noise that appears to originate from the ![]() Amethyst Gem we spot in one of the corners. Additionally, there are various floating orbs that will explode on touch, hence we have to exercise extreme caution when navigating across the room. As Adam and Rebecca notice, the gem emanates a great power, as if it's calling to us, specifically to the incomplete
Amethyst Gem we spot in one of the corners. Additionally, there are various floating orbs that will explode on touch, hence we have to exercise extreme caution when navigating across the room. As Adam and Rebecca notice, the gem emanates a great power, as if it's calling to us, specifically to the incomplete ![]() Spirit Ring in our inventory. After picking up the gem, a disembodied voice inquires us to complete the ring. The act of completion is acoustically accompanied by a short, monastic sort of chant, the glowing orbs will rise and explode after a while. Proceeding through the golden double-winged door, we stand on the pedestal in front of us and put on the Spirit Ring. This will trigger a cutscene in which Raysiel informs us that we have successfully completed the trials and rewards us with the Key of Tears:
Spirit Ring in our inventory. After picking up the gem, a disembodied voice inquires us to complete the ring. The act of completion is acoustically accompanied by a short, monastic sort of chant, the glowing orbs will rise and explode after a while. Proceeding through the golden double-winged door, we stand on the pedestal in front of us and put on the Spirit Ring. This will trigger a cutscene in which Raysiel informs us that we have successfully completed the trials and rewards us with the Key of Tears:
![]() Raysiel - The Key of Tears
Raysiel - The Key of Tears
Premature game ending: if we put on the ring before entering through the golden door, we will be imprisoned by Raysiel:
![]() Raysiel - Prisoners
Raysiel - Prisoners
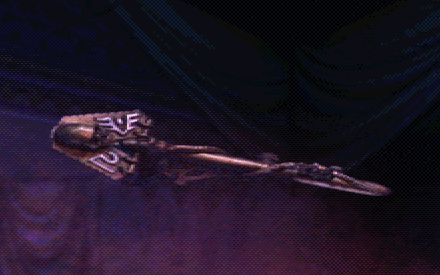
The design of the Key of Tears ![]() coincides with the description found in one of the
coincides with the description found in one of the ![]() parchments that we picked up in Florentine's Library about the appearance of Raysiel, stating that "skeletal bat-like wings [protrude] from his temples". Additionally, we find the symbols of
parchments that we picked up in Florentine's Library about the appearance of Raysiel, stating that "skeletal bat-like wings [protrude] from his temples". Additionally, we find the symbols of ![]() Sheol and
Sheol and ![]() Raquia affixed to the key pinch.
Raquia affixed to the key pinch.
Return to Heled[]
Having acquired the Key of Tears, it's now time for us to bid farewell to the Realm of Spirit and to find our way back to Heled. Through the Sarcophagus in the Mansion's Study, we can now free Hawk from his prison. Our departure from Raquia will be considerably complicated by a multitude of enemies, specifically ![]() Icons and
Icons and ![]() Shadows. Additionally, in case we accidently set off the massive bell, we'll be confronted with a variety of active Traps strewn across the Maze:
Shadows. Additionally, in case we accidently set off the massive bell, we'll be confronted with a variety of active Traps strewn across the Maze:
 |
 |
 |

|
|---|
- Steel Trap Doors
- Moving Hedges that reconfigurate the layout
- Pitfalls
- Piercing Fences that abruptly shoot up from the ground
- "Nasty Chainsaw[s]"[9]
- "Naughty Mincing Machine"[10].
Back in the Tower, we move down the spiralling path and follow the straightforward route that originally led us to the portal to Raquia, until we find ourselves back inside the Temple of the Morning Star. If you wish to follow this walkthrough chronologically, please click on the following icon to continue reading about our return to Hawk's Prison.

Videos & Script[]
Cutscenes and pieces of dialogue and script, relevant to our understanding of Raquia.
| “ |
Adam: Rebecca, is it me, or... is there something not quite right in Raquia? |
” |
Notes[]
Personal Musings[]
It's interesting to note that the rooms in some way seem to mirror locations, by containing specific architectural elements or items that we have already or will still come across during our travels. Please refer to this page for a more detailed look at these similarities. For now, let's go through some examples:
Apparently, when designing Raquia, the developers put a lot of focus on the acoustics, as sound is a prevalent theme here. Apart from the pleasant and calming song of the birds, the major element in this Realm is Raysiel's insensitivity and intolerance to noise. As such, there are plenty of ways for us to upset him: the bell room with the spinning cogs and the large bell on the ceiling; the squeaking of some wooden doors that can only be averted by oiling their hinges with the substance from the flask; multiple stacks of books that are connected with laser rays and so designed to fall over by heedless movement; the Nightingale Floor whose floor boards creak under our weight unless we wear the magical Silver Armlet; the Icy Room whose fragile floor will audibly break under our weight. For some reason, the little fanfare we clumsily play on our Pan Pipes does not appear to bother him, though. Apart from these elements, one of the rooms in Raysiel's Tower also incorporates a reference to the ancient Greek myth of Odysseus and the Sirens, who averted the fatality of their alluring song by occluding his ears with wax. This story is reflected in-game by the floating Siren and the Earplugs.
As discussed in this article, some of the elements in Raysiel's Tower seem to mirror events or objects that we've either already seen on our journey or will still be encountering later on. Maybe Raquia, the Realm of Spirit, can thus be thought of as a dream-like plane, where events and objects from reality intermingle with Adam's dreaming experience.
- The Fire Room, for instance, uses the same textures as Hawk's Prison and the Temple of the Morning Star, while the small Chapel and the Library can be read as previews of St. Michael's and the Laboratory in the basement of Charles Randall's Vicarage, respectively.
- The Nightingale Room could be a reference to the Mansion's Dormitory where we noticed a distinctive squeaking sound when moving across the old floor.
- The Garnet that we pick up from the stained glass window has the same sprite as the gem that we had to offer to the Guardian of the Caverns.
Theological Background[]
According to Kabbalah, the school of thought concerned with the mystical aspect of Judaism, there are four different worlds (or rather stages of the creation process) which are hierachically ordered and together constitute the Tree of Life. These are (in descending order):
- Atziluth, or "World of Emanation"; the realm of pure divinity.
- Beri'ah, or "World of Creation"; the realm of pure intellect; here dwell the biblical archangels, namely Michael, Raphael and Gabriel.
- Yetzirah, or "World of Formation"; the abode of the "lower angels," men's souls and the Garden of Eden.
- Asiyah, or "World of Action"; the material universe in which we live.
Yetzirah has seven heavens, Raquia being the second lowest heaven. Its guardians are two archangels, Zachariel and Raphael, and it is considered the realm where the fallen angels are imprisoned[11] and to which the planets are fastened.[12]
References[]
- ↑ According to the descriptively titled texture, extracted from the DEMO1.DAS folder of our ROTH installation: RAQPIL1.rose covered pillar.bmp
- ↑ PC Power #33: Early on in the game, a 'sound' theme is evident - for example, in one room if you touch the floor a bell chimes, waking, and annoying the resident spirit. Later on, in a room with a frozen floor, cracking the ice alerts local demons - the sound echoing through the silent corridors. The story behind the sound theme isn't a long one; "I was sat there one day and thought, ooh, wouldn't that be nice," Paul Green told me.
- ↑ As referred to in texture description, found in the ROTH/M/DEMO1.DAS folder: RHEDGE2.ROSE HEDGE.BMP
- ↑ Texture, as found in the ROTH/M/DEMO1.DAS folder: ANTREE5.poplar tree.bmp
- ↑ Texture name (extracted from DEMO1.DAS folder): OFIGURE1.olympian figure.bmp
- ↑
“ Raysiel: Someone treads my hall. It is the son of Adam. Be warned boy. The need of your realm is great; tread softer. So be the gift of the Master Jailer.
” - ↑
“ Rebecca: These things are designed to fall over. Too much noise and we fail the test. Try not to knock any more over.
” - ↑ Nightingale floors (Japanese uguisubari), designed to make a chirping sound when walked upon, were used in the hallways of some Japanese temples and palaces as a security device, assuring that no one could sneak through the corridors undetected.
- ↑ Texture description (DEMO1.DAS folder): CHAINSAW.nasty chainsaw.bmp
- ↑ Texture description (DEMO1.DAS folder): NITEMARE.naughty mincing machine.bmp
- ↑ The Legends of the Jews III, The Ascension of Enoch.
- ↑ The Legends of the Jews I, 22.